Browsing Tag

crafts

Uncategorized

Creative Envelopes: Puffy Pumpkins

If I’m going to send Halloween cards, I might as well make them pretty, right?

Yes, I blurred out the address. Wouldn’t want to give away who’s getting this snazzy card. Also, they might not like getting tons of mail from strangers. Unless you guys are sending money, then you can just send it to me. I’ll make sure it stays safe for them.

Start with the puffy paint.

So to start, you’ll want to make the bottom of the pumpkin. It’s basically three ovals, but tight together and don’t fill in the middle lines in the pumpkin. Look at the design I made, easier to follow that way, probably. Then go in with green for the swirly vine and the leaf.  Let dry over night.

Yay, so cute!


I’m so pumped about this and can’t wait to see if they like the mail!

Share
Uncategorized

DIY Painted Wooden Spoons

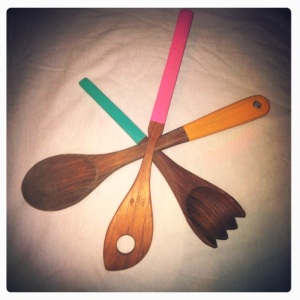
I’m not going to lie, I did find this idea on Pinterest first. I like to think I’m creative, but honestly, I was just pumped that I found something that I was capable of making – painted wooden spoons. I had spent the day dodging people dressed as aliens – yes, aliens – in Exeter to get to the antique shop. Like I’ve said before, this place is awesome, full of goodies ready to be refurbished, and the lady who runs it will most likely give you a deal on anything you buy, especially if you buy a lot of stuff. Some day, I just want to go in there and buy everything and spend months on end doing craft projects. I’m disappointed that I only bought three wooden utensils, though. I didn’t know how this project was going to pan out, so I didn’t want to buy enough to supply an army. That will teach me to think practically.

So back to the aliens. It was the annual UFO festival (<– I linked the site) where kids dress up with antennae sticking out of their heads, have UFO making competitions, and serve up food that I’m sure they think aliens would eat. (I’m making that last part up, I’m pretty sure I only saw hot dogs at the stands, but I could be wrong).

When I got home, I got to work on these babies, making sure to have my trusty dusty tape and fine sandpaper at the ready. I also had multiple colors of acrylic paint and this Martha Stewart Satin Finish.

So I wiped down the spoons, they were, after all, a bit dusty from sitting around the shop. Then I sanded them down a bit to make them smooth as a baby’s bum. (I’m really not sure where that phrase comes from, it seems a bit silly to me.)

I taped the handle so that there was still a bit of room from the serving end to the handle. This would serve as giving me a straight line when I paint, as well as knowing where to stop.

So I painted two to three coats on each handle, making sure not to go over the tape to the other side. Then finished with the Martha Stewart Satin Finish. Don’t forget to let them completely dry between paintings. This whole thing took me about four to five Mad Men episodes.


Then, when they were all dry, I carefully removed the tape from the handle. And Voila! We have some sweet new cooking utensils!!

Still pretty!

Share
Uncategorized

Gettin’ Deals – Antiquing

Took a drive today to Art&Tiques in Exeter. Love this place. When you walk in, it’s like everything that was taken out of hoarders homes was piled into this one shop. There are racks upon racks upon racks of knick knacks, dishes, frames, old tins, glassware, and more. The best place for you to start an antiquing adventure. You name it, it’s probably piled somewhere in there, you just have to take the time to look .

Totally recommend going if you’re ever in the area. And now, I have supplies for multiple craft projects!!


Share
Uncategorized

Recycled Bow Frenzy

We had an emergency at work.

It was my co-workers birthday and we didn’t have a bow for his birthday cupcake. FOR SHAME! Don’t worry, I put on my crafting cape and came to the rescue. Might have shocked some people (myself included) that the final result was actually really good. First off, I work with magazines, so there is always paper around. The next thing was just finding scissors, tape and/or a stapler. I know, I know, you’re like, what is this non-crafty-crafty girl doing. Trust me on this one. If I can make a recycled bow, you can, too.

I found an ad in a magazine with lots of color space and little text. Score one!

Then I started cutting strips. Okay, I really did the whole fold and refold, then rip method, but they all ended up being the same width. So it worked. Thank you years as an elementary school student making fortune tellers.

I actually didn’t end up using two of the middle strips. Didn’t matter though.

That is what I ended up with, I made some longer than others. The hard part came next when I had to figure out how to twist the strips to make what looks like a two-ended shoe. See below for what I mean. You’ll get it… I hope. Basically you flip one end and make the other end match it. Tape the ends and then stretch it a bit and tape that into place behind the center of your strip so it doesn’t move.

One “shoe” down!

Oh yeah, you’ll notice that since I wasn’t working with food, I was able to use filters on my photos. I love doing that, but feel like you can’t tell what the food looks like if you use filters all the time. Sadness.

Anyway, I digress. So then I layered the “shoes,” biggest on the outside and working my way in. Staple the center. I also took that smallest strip and made a mini circle with it.

Circle!

Almost there, just a few more layers.

Then I taped the last circle piece in and VOILA! I had a bow! Isn’t it adorable?

Look, ma. I saved like three bucks by making my own!

See, you’d never know. I bet someone would pay big bucks for a bunch of those… maybe I shouldn’t have shared my secret. hmmmm

And there you go, a cheap version of a bow. You’re also saving the environment! Go green!

Share